DD-WRT Printer Sharing

On the DD-WRT Control Panel, go to the Services->USB tab in DD-WRT and enable Core USB Support, and USB Printer Support. Save and apply.

On Mac OS X:

  1. Download and install Gutenprint (formerly known as Gimp-Print). This is critical as DD-WRT will only work with a CUPS printer.
  2. Go to System Preferences->Printers and Scanners
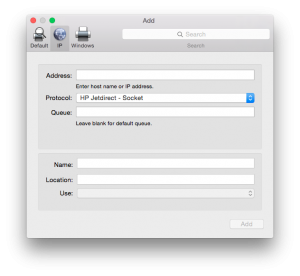
  3. Add Printer (click the + button)
    add-printer
  4. Select IP
  5. On the address, enter the router’s address (normally 192.168.0.1)
  6. On the protocol field, make sure it is “HP Jetdirect – Socket”
  7. Leave the queue field blank
  8. On the name field, replace the address with something user friendly
  9. On the location field, add the location of the printer (optional)
  10. On the use field, choose “Select Software…” and look for your printer in the list. Make sure it’s the “CUPS+Gutenprint” version. Again, this is critical as DD-WRT will only work with a CUPS printer.
  11. Click “Add”
  12. Select the new printer and print a test page

Now you have a network printer shared via DD-WRT!

Unbricking the Buffalo AirStation Nfiniti High Power G300NH2

I accidentally bricked the Buffalo AirStation Nfiniti High Power while attempting to downgrade the firmware. It keeps looping through boot and the DIAG light just stayed lit. I couldn’t get an IP via wireless or wire. A 30-30-30 reset didn’t work either so I knew I had a bricked router.

I tried to follow the instructions when using a MacBook Pro but I just couldn’t get it to work. Finally, I brought out Selene, my good old Thinkpad X22. I then followed the instructions when using a Windows PC with some variation:

  1. Unplug the ethernet cable and the power cable from the router
  2. Connect the Thinkpad directly to one of the router’s LAN port. Again, do not use the WAN port.
  3. Go to Control Panel\Network and Dial-Up Connections.
    Right click on local area connection and choose “Properties”
    Choose “TCP/IP Properties”. Click properties then click “Use the following IP address”. Enter these values: IP address 192.168.11.2, subnet mask 255.255.255.0, default gateway 192.168.11.1
  4. Open a console window. Go to Windows\Command and run “cmd”
  5. Clear the ARP table. Type “arp -a -d”
  6. Enter the IP to the router’s bricked-state MAC address in the ARP table. Type “arp -s 192.168.11.1 02-AA-BB-CC-DD-1A”. Note that this is not the router’s real MAC address
  7. Verify the new ARP entry. Type “arp -a”
  8. Download (using some other Internet connection obviously) and transfer openwrt-ar71xx-generic-wzr-hp-g300nh2-squashfs-tftp.bin
  9. Change directory to where you downloaded the file.
  10. Transfer the file via TFTP to the router. Type “tftp -i 192.168.11.1 openwrt-ar71xx-generic-wzr-hp-g300nh2-squashfs-tftp.bin” but do not press enter yet
  11. Quickly plug the power cable into the back to turn on the router
  12. Quickly press enter
  13. Timing is critical as there’s only about a 4-second window when the router will accept the TFTP connection. You might have to to steps 9 to 11 repeatedly until you get a successful transfer
  14. After 5-10 minutes, unplug and replug the router

At this point, the router should have been unbricked and has OpenWRT. Move to the MacBook Pro and connect it directly to the router. You should be able to get IP via DHCP. If not, repeat the above.

  1. Open a Terminal window.
  2. Telnet to the router. Type “telnet 192.168.1.1”
  3. Type “passwd” and enter a password. This will disable Telnet and enable SSH.
  4. On the Mac, download wzr-hp-g300nh2-dd-wrt-webupgrade-MULTI.bin (again, using some other Internet connection). In the instructions, this was done in the router using wget. However, I couldn’t get the WAN connection working.
  5. On the Terminal window, change directory to where you downloaded the file.
  6. Type “dd bs=28 skip=1 if=wzr-hp-g300nh2-dd-wrt-webupgrade-MULTI.bin of=firmware.bin”. In the instructions, this was done in the router. However, I was running out of disk space when I tried that, so I did it in the Mac. Thankfully, the output file is valid.
  7. Copy the file to the router. Type “scp firmware.bin [email protected]:/tmp”. Input your password
  8. SSH to the router. Type “ssh -l root 192.168.1.1”. Input your password
  9. Change directory to /tmp. Type “cd /tmp”
  10. Upgrade the firmware. Type “sysupgrade -n /tmp/firmware.bin”
  11. Wait 5-10 minutes for the router to reboot
  12. If you’re lucky, you should already have DD-WRT when you go to http://192.168.1.1 and configure as needed.

30-30-30

I’ve been having problem with my Globe Tattoo Mobile WiFi for the past few days. I tried everything: reboot, tweaking the settings (with and without tech support), transferring the SIM to different devices, to no avail. So I applied for a 15-day trial of SKYbroadband with the intent to switch if it proves to be good.

This morning, the SKYbroadband team arrived and quickly set up the cable modem. When they left, I went to work and configured my Buffalo AirStation with DD-WRT. I set the router to DHCP and connected the modem. It wouldn’t work! I tried reboots, resets, pre-configuring the TCP/IP settings, downgrading up to two DD-WRT versions back, etc. All to no avail.

Finally, after some research, I found out that there seems to be a bug where the old settings are retained and read. The solution is simple: 30-30-30 aka Hard Reset:

  1. While the router is powered on, hold down its reset button for 30 seconds
  2. While still holding down the reset button, unplug the router and hold for an additional 30 seconds
  3. While still holding down the reset button, plug in the router and hold for 30 more seconds

When the router booted up, it immediately grabbed a WAN IP and I was finally able to able to use my SKYbroadband trial. And can I just say I’m loving it.

Buffalo AirStation Nfiniti High Power and DD-WRT

I was in the area so I invited James, Drawde, and Alex for lunch. James was unavailable but Drawde and Alex were. And as luck would have it, Drawde treated us to lunch at Seven Corners no less. Thanks Drawde!

As happens often when we get together, talk turned towards gadgets and electronics. Soon we were on the way to gadget-wonderland CD-R King where Drawde and Alex got mobile battery packs. After that, Edward had to run off somewhere. Alex and I went to CompLink where we discussed how to upgrade my home networking infrastructure.

Previously, I had cobbled  together a rag-tag bunch of devices providing different network services:

  1. Huawei D100 router with Huawei E1550 USB modem – for 3G Internet connection
  2. Tenda W311R+ – for Wireless-N
  3. CD-R King 5-port gigabit Ethernet switch

I eventually got rid of the Tenda because it was having connection problems which left me with:

  1. Huawei D100 router with Huawei E1550 USB modem – for 3G Internet connection and Wireless-G.
  2. CD-R King 5-port gigabit Ethernet switch

Unfortunately, it meant I had no more Wireless-N and I still had one too many devices for my network infra. Unsatisfactory.

Going through the available products, we saw the Buffalo AirStation Nfiniti High Power. It’s got both Wireless-N and gigabit Ethernet ports but no 3G USB modem support. However, Alex said since according to the packaging it has DD-WRT firmware available, I can probably enable 3G USB support. So I took it.

I got to work as soon as I got home. I found out that Buffalo had thoughtfully included a customized DD-WRT with the installation CD. I updated the firmware to that and found out that it doesn’t support a 3G USB modem. Hoping that a newer version would, I downloaded the latest customized DD-WRT from the Buffalo website. No luck either.

I tried looking for plain vanilla DD-WRT firmware at the DD-WRT router database but only found one for the WZR-HP-G300NH model which would have bricked my WZR-HP-G300NH2 model. It took a little bit more digging before I finally found the proper firmware. I updated the firmware to that and, voila, 3G USB modem support! A little more configuring and I got my dream one-device home network infrastructure. Thanks Alex!