Month: December 2014

AirPrint Through A Mac

If you don’t have an AirPrint-compatible printer, you can still print on your iDevices with the help of a Mac. Of course, you’ll need to keep said Mac on while printing :P

You have several options: Printopia ($20), Handyprint ($5 donation), and NetGear Genie (FREE). Free is good so NetGear Genie is it. It’s also the easiest to set up.

On Mac OS X:

  1. Download and install Genie.
  2. Start Genie and go to “AirPrint”. Select the printer you want to make available for AirPrint.

On your iDevice:

  1. On the pertinent app, select the “share” button.
  2. Select “Print”. This will take you to the Printer Options screen
  3. Select Printer
  4. Set the number of copies if you want
  5. Select “Print”

That’s it.

DD-WRT Printer Sharing

On the DD-WRT Control Panel, go to the Services->USB tab in DD-WRT and enable Core USB Support, and USB Printer Support. Save and apply.

On Mac OS X:

  1. Download and install Gutenprint (formerly known as Gimp-Print). This is critical as DD-WRT will only work with a CUPS printer.
  2. Go to System Preferences->Printers and Scanners
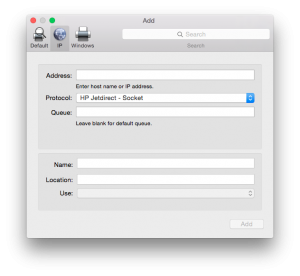
  3. Add Printer (click the + button)
    add-printer
  4. Select IP
  5. On the address, enter the router’s address (normally 192.168.0.1)
  6. On the protocol field, make sure it is “HP Jetdirect – Socket”
  7. Leave the queue field blank
  8. On the name field, replace the address with something user friendly
  9. On the location field, add the location of the printer (optional)
  10. On the use field, choose “Select Software…” and look for your printer in the list. Make sure it’s the “CUPS+Gutenprint” version. Again, this is critical as DD-WRT will only work with a CUPS printer.
  11. Click “Add”
  12. Select the new printer and print a test page

Now you have a network printer shared via DD-WRT!